RANGE•ROVER™ Series Micro-Adjustment Ball Bearing Replacement Process

If the spring and ball bearing of the micro-adjust feature on your Range Rover series sight fell out hopefully you were able to find them, if not, give us a call. After you find the spring and ball bearing or receive the replacements from us please refer to the below steps for re-installation.


  1. Start by loosening the set screw located on the adjustment knob. It will be the flat head screw head located at the opposite end of the micro-adjust knob.
  2. To remove the adjustment knob rotate the knob counter-clockwise.
  3. When removed, place the spring and ball bearing in the hole located near the main guide screw.
  4. Gently tighten adjustment knob back on while making sure the ball bearing does not fall out.
  5. Use a flat headed screwdriver to advance the screw while holding on the adjustment knob.
  6. Tighten set screw.

Having Trouble Sighting in Your Bow Sight?

It is not uncommon to encounter difficulties during the zeroing process of an archery sight. Because there are several factors involved and we want to be sure to offer you the best advice possible please give us a call at the number below and we can have one of these archery sights in our hands. We can review your situation over the phone and make recommendations from this information. We’d recommend taking your bow to the local archery pro-shop or range where you made this purchase, for their expertise and assistance in getting your bow sighted in. There may be some small detail(s) that have been overlooked in this setup that are influencing your shooting results.


Customer Service Phone Number

972-774-0300

Toll Free: 877-269-8490


My Lens Kit is a Little Blurry and Unclear, What Can Be Done?

If you recently acquired one of our lens kits these lenses should not appear blurry, but can benefit from the use of smaller diameter peeps…smaller than what may be presently installed. If this smaller diameter peep does not resolve the clarity of the aperture/target image, we’d recommend to take this lens back to the dealer where it was purchased.


The dealer where you purchased this sight is authorized to make an over the counter replacement of this product for you if you are having trouble with any mechanical aspect of the product. Please be sure to have your original sales receipt and UPC Code (bar code) from the original packaging.


If your dealer is not able to make this replacement, you can contact us at the number below to request a Return of Merchandise Authorization (RMA) number.

How to Convert my PENDULUM Sight for Left Hand Operation?

The PENDULUM sights (Item#TG700 and TG701) are well suited for left-hand use.


When you flip the riser bracket, the elevation gang will be in its opposite orientation from its as shipped design. The two screws above the aperture need to be removed, so you can rotate the aperture and re-secure the two screws. The light will now be to the outside when installed for left-hand use.


Left-Hand Adjustment:

1. Flip the bracket upside down.

2. Remove the screws from the top of the aperture, rotate the aperture 180 degrees and re-install the screws (do not overtighten).

3. Re-install the adjustable yardage stop.


How to Convert my Rival Hunter Sight for Left Hand Operation?

To get your pins properly set for left-hand operation, you will first need to completely remove the clear plastic fiber guard.


Next you will need to remove each of the fives pins.  These pins will then be relocated largest at top, to smallest at bottom. It is important to re-route these five fibers through the same port that lies inside the aperture and runs directly under the push-button light. At this point, the push-button pin light will be at the bottom of the sight, with the pin fibers entering into the port and directly into the illumination area for the light.


Last step is to remove the aperture from the elevation assembly, once this is removed flip the bracket backward so that the TRUGLO logo is now upside down. Reinstall the aperture so that the largest diameter pin is on top. Reinstall the clear plastic fiber guard and secure with the removed screws.

How to Convert my RANGE•ROVER™ PRO Sight for Left Hand Operation?

We are addressing this Left-hand conversion by offering a riser assembly from one of our Left-Handed Range Rover Single Pin sight (TG6411BLH). This riser assembly will allow you to remove your aperture (1 screw) and reinstall the LED head on this factory set left-hand riser.


All we require for you to receive this left-hand riser assembly is a copy of the proof of purchase (UPC CODE) from your packaging and a copy of the receipt from your dealer of purchase. Once this requested information is received, we will ship this left-hand riser assembly.


Please email all requested information to [email protected] including: name, address, and contact info.

How to Convert my Micro-Brite Sight for Left Hand Operation?

The conversion of the Micro-Brite Sight to left-hand operation is not difficult.


  1. First, remove the windage lock.
  2. Next, remove the two windage assembly mounting screws located on the underside of the riser bracket, directly below the windage lock.
  3. Slide the bracket from the windage assembly.
  4. Flip the bracket so the windage lock removed earlier is now positioned down.
  5. Reassemble the sight.
  6. You will now need to relocate the pins so they are in descending order, largest to smallest, from top to bottom.
  7. To switch the pins, first remove the clear plastic fiber guard that encircles the aperture. Some earlier Micro Brite sights have two clear fiber guards, both must be removed for this step.
  8. You will not need to remove the middle pin, it remains in its factory position.
  9. Fully unscrew each pin and keep record of which track it was removed.
  10. Relocate it the opposite order, in the same track, descending in size from top down.
  11. Sometimes it is helpful to use a small piece of tape to hold the fibers in place while wrapping these back onto the aperture.
  12. The level can now be removed and relocated to its opposite installation position for left-hand operation.
  13. Replace the fiber guard and the conversion is done.

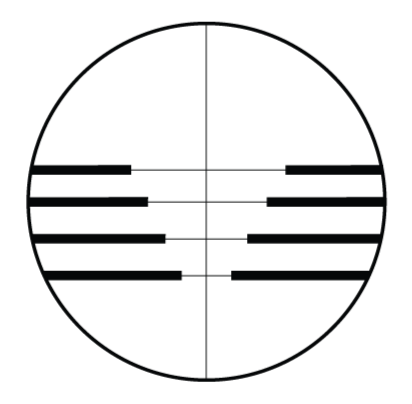
4x32mm Crossbow Scope Reticle Information

The TRUGLO 4x32mm Crossbow Scope comes with a great feature of having Range Finder/BCD reticle designed for crossbows. The different yardage lines (stadia lines) you see are not necessarily representing 20, 30, 40 and 50 yards respectively. In a perfect scenario, they might each represent ten yard gaps in range. Due to different crossbow performance values, speed of the bolt, weight of the bolt, broadhead, or target point, vane configurations, there are many factors influencing flight and POI (Point Of Impact) results.

Where your arrows find their zero/POI is something you will need to discover through shooting results before or beyond these theoretical 10 yard increments. It is quite possible for a sight to work at two yardages, in your case, 20 and 30 yards, and not hit the next mark, presumably 40 yards. In your case, your POI is high, which might indicate a faster speed of your bolt.  This being the case, you will need to discover through actual shooting results, the distance that best coordinates with the third crosshair down, somewhere past 40 yards. This will probably also be the case with your fourth crosshair, actual shooing will determine the distance of the convergent POI result. Once these two longer POI distances are confirmed, you can then make a note for reference.